Brush up your git command skills!
The beginner’s version!
Before going to the main concept, I want to give clarity on why git?
Have you guys ever played Prince of Persia on PC? then, you might be knowing the concept of save points from that game. I remember playing that game for a lot of time and after you finish a level you can save the progress till there using a save point. what if you were to play that game for like a whole day and when you get yourself killed (in the game obviously) you restart the game every time? sounds boring to me. This concept of savepoint is actually what git uses! let me dive in with the terminology it uses.
The three main words I captured from the git discussion are,
1.Current directory
2.Staging area
3.Repository
- Current directory: This is where your all folders and its files will be located, these are required to be staged(will talk next) before committed.
- Staging area: This is where your staged files or folders will come and sit. Let me clear what staged means, it’s a mechanism followed by git in which the files that you edit will not be saved directly onto the git server until you commit. so, what happens when you perform a change to a file that you want to store on the server? It comes to (or) is placed into the staging area, when all the necessary updates are done, only then we can commit all the changes. so, what is a commit?
- Repository: This is where the files and folders that you commit will come and sit. commit is again a terminology followed in git to save the file and/or folders onto the server.
Now, that you got an idea of why git is needed and some basic terminology in git, let’s now dive into commands I have learned with some explanation.
1. git init : initializes a new Git repository.
2.git clone gitRepoLinkOnline : clones an existing repository present online to your local folder. The thing with this command is, when you execute this command, it just clones the repo(fancy name for repository) name as the name given by the owner of that repo. what if we need some flexibility of having our own name for the repo we clone?
3.git clone gitRepoLinkOnline <space>yourRepoName : Now this will clone the existing repo with your repo name as the main directory.
4.git log — oneline : displays a SHA code(just first 7) followed by a commit message. good for getting an overview of commits that took place!
5.git log : displays information on SHA code, author, date, and the commit message.
6.git log — stat : displays information on files, that were committed on that directory along with no. of insertions and deletions details.
7.git log -p : displays exactly what files were modified in that commit along with the content modified! (awesome right?)
In the above log commands, if there were 30 commits, we have to scroll through all of them using pg-up,pg-down/arrow keys, etc ., what if we can go to a particular commit using its SHA?
8.git log -p SHA-code : we can directly scroll to the given commit directly based on SHA(the catch is that it still will display us all the commits when scrolled up/down).
9.git show SHA-code: now this will eliminate the issue with the previous command, this command just displays the commit that you intend to see!
10.git show: by default, this displays the commit, the author, the date, commit message, the patch info. (the patch info is nothing but the git log -p command’s output).
11.git add: moves untracked files to the staging index.
what if I add a file to the staging index by mistake? how to undo it?
12.git rm — cached filename: bring the file back from the staging index.
13.git add . : will add all the changes to the staging index.
14.git commit -m “added header to CSS file” : for short commits, you can use this.
15.git diff : the output of this is the same as git log -p , since the log version uses diff internally! (cool right?)
coming onto tagging...
A Tag is a permanent pointer to a commit. let’s look at some commands we can use for tagging.
16. git tag -a v1.0 : This opens up your code editor(by default vi editor), After opening up the editor, this command will wait for us to supply a message for that tag. using -a to this tag is a good programming practice since not using ‘-a’ will result in a light-weight tag.
‘-a’ tag will display info. on person who made the commit, date and a message about the tag.
17.git tag : gives info. on the tags that you have created.
what if you spelled a tag name wrong? A good way to fix it is by deleting the tag that is misspelled and adds a new tag to it. so, how exactly to do this?
18. git tag -d v1.0 : deletes the tag with v1.0.
Running
git tag -a v1.0will tag the most recent commit. But what if you wanted to tag a commit that occurred farther back in the repo's history? Just usegit tag -a v1.0 SHA-code.
onto powerful concept branching!
so, all this time we have been working,
when we use the git log, it shows head->master, check this image out...

so, what’s the link between commit and branch? why am I talking about this now? let’s dive deep into this.
what happened exactly when you committed the file/folder is that, a new branch is created with the SHA of that commit and the ‘head’ pointer is pointed to the latest commit (In the image, d0edf4 is the latest commit). what is ‘master’ in the image? you may get this doubt, the answer is it is a branch that is created by default and always head points to it by default.
Let’s create a new branch and get more clarity on what I am talking about.
19.git branch sidebar : what this does is creates a new branch to the latest commit with the sidebar as its name.
At this very point, the master & sidebar will be pointed to the latest commit. the question that may arise is, which branch will move if we commit now? the answer is, none of those two but the ‘head’ pointer. let me give clarity on this too...
As I said ‘head’ pointer will point to the latest commit with ‘master’ as its default branch, now both branches(master & sidebar) are at the same point. To toggle between the branches, with ‘head’ pointer, we can use
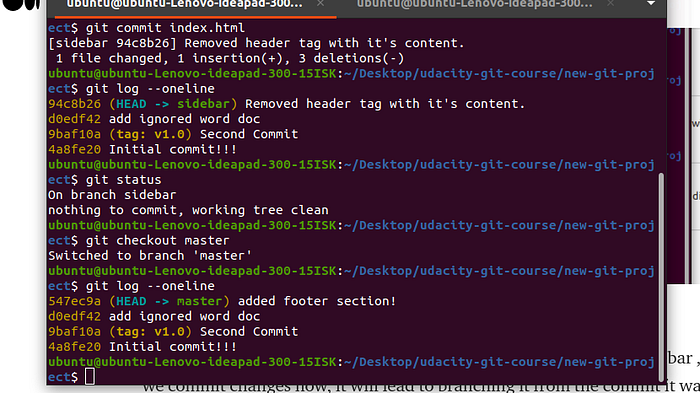
20.git checkout sidebar : toggle the ‘head’ pointer to the other branch at the same commit. don’t believe me? check the image below.
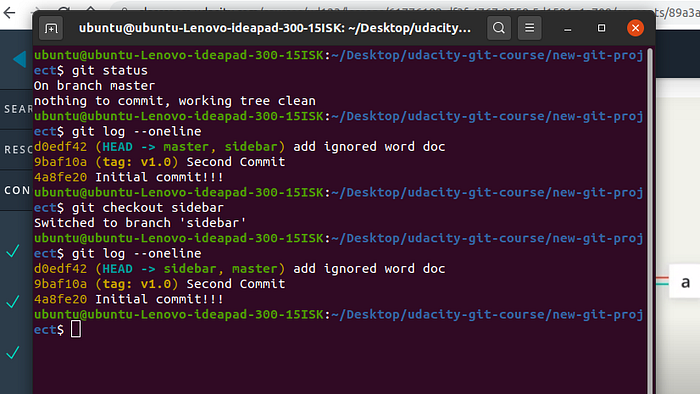
In the above image, I used git status , to check if there is anything to commit. later, I used git log — oneline , to get single line info. on commits, in which you can check the ‘head’ pointer pointing to the master along with a new branch sidebar. now I switched the branch using the git checkout sidebar. logging it again gives us the expected output which toggles the ‘head’ to the sidebar branch.
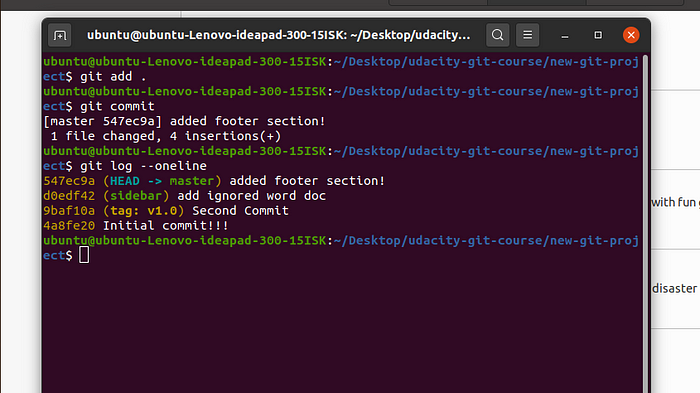
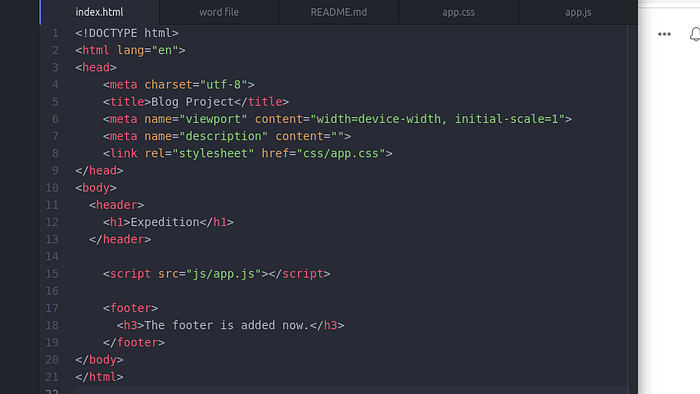
Assume that ‘head’ is pointing to the master branch itself and the sidebar branch is also at the latest commit. Now, performing commit leads the‘ head’ pointer to move to the latest commit, and since the master branch is associated with the ‘head’ pointer, the master will move forward along with the ‘head’ pointer, but the sidebar will still stay with the previous commit. (check image below)
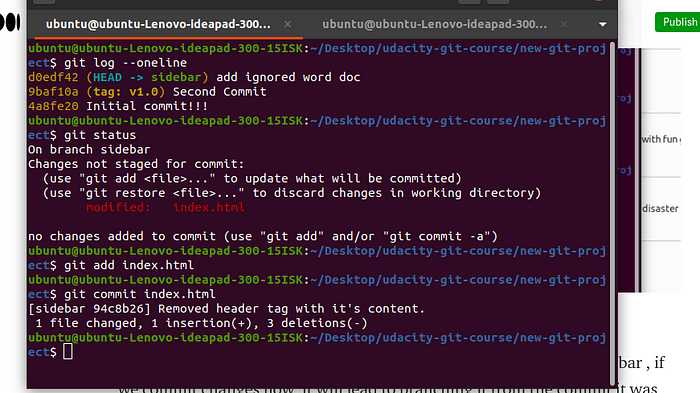
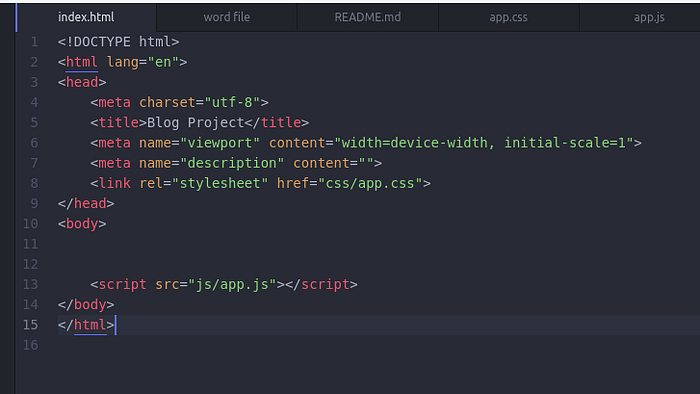
let’s now toggle the ‘head’ pointer, which brings the ‘head’ pointer to the sidebar, if we commit changes now, it will lead to branching it from the commit it was present previously (i.e, d0edf42). now at the d0edf42 commit, there are 2 branches, one for master and another for the sidebar. (are we cool till here? take a look at the below images).
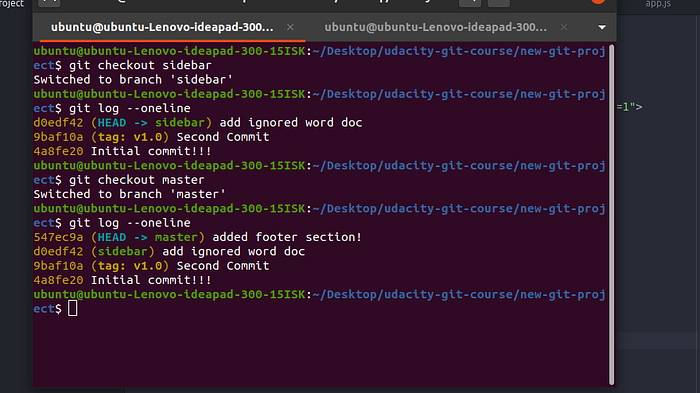
The above 3 images provide extreme information on how the branching works and how it can be useful in real-world scenarios. you can see that the master branch has its own path and the sidebar it's own.
we can create a branch at any commit using,
21.git branch <branch-name> SHA-code : creates a branch right there at that commit and lets you work from there on in a different branch separated from the original path( we reached where we started, ie., save point concept).
One thing i want to clear out right now is that , whenever we create a branch, each branch displays its own commits based on to which branch ‘head’ is pointing to. If ‘head’ points to master branch now , git log — oneline (check the images above once) will give changes w.r.t. the master branch.
The way we currently work with branches is to create a branch with the git branch command and then switch to that newly-created branch with the git checkout command.
But did you know that the git checkout command can actually create a new branch, too? If you provide the -b flag,
22.git checkout -b the-new-branch : you can create a branch and switch to it all in this one command.
23.git log — oneline — graph — all : shows details on actual branching that happened inside of all the commits.
finally onto merging!
24. git reset — hard HEAD^: undo a commit that happened.
25.git merge <name-of-the-branch-to-merge-in>: merges this mentioned branch with the branch to which ‘head’ is pointed to right now.
Remember these points while using merge,
When a merge happens, Git will:1.look at the branches that it’s going to merge.2. look back along the branch’s history to find a single commit that both branches have in their commit history.3. combine the lines of code that were changed on the separate branches together.4. makes a commit to record the merge.
let me dive into merge command,
Right now, assume that I have 2 branches i.e., master and sidebar. Both are almost the same except that the master has <header> tag and <footer> tag in index.html and sidebar have none of those tags.
My aim is to use the merge and get the state of the sidebar branch to the master branch. i.e., now after the merge is done my output in the sidebar branch’s index.html should look like what it looked in my master branch’s index.html.
check the present state of two files.
check the commands for merging the master branch to the sidebar.

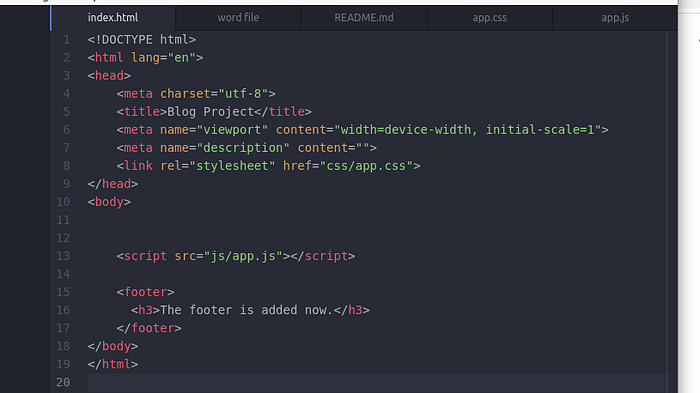
Now, I got unusual output with <header> tag missing from the sidebar branch’s index.html. because that change to the master branch didn’t happen in the two different branches that are created on a single commit. so, the only change reflected, is the footer which was changed in the different branches from the same commit.
That’s all for now! I hope you understood what I’m talking about. This is like a crash course to revise all the git concepts you have learned. Bookmark this and keep revising these concepts! see ya guys in another post.
